Golden Bead Quilt


I am very excited to share my latest crafty creation. This was a project given to me by my son’s Montessori teacher. She saw a photo of a cool mat in Tomorrow’s Child magazine (Winter 2008, in a section about the Bank Game on page 21), published by The Montessori Foundation, and was hoping I could recreate it. I could not find something similar for sale anywhere! I did find it in one place – a Montessori school that apparently sold different handmade materials as a fundraiser for their school. However, you could only purchase it from their catalog, and their website did not give any size specifications for the mat. So, I used the picture in the magazine, which had two children using the mat, as a way to guesstimate size. And then I went from there in designing it.

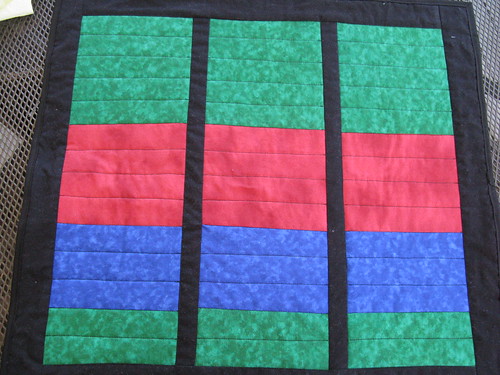
I am very proud of how it turned out! It’s about 24″ x 28″. The top set of green squares are 7.5″ wide, the red squares are 6″ wide, the blue squares 4.5″ and the bottom green squares are 3″. I then quilted across the squares at 1.5″ intervals. So, the top green square has 5 lines, red has 4 lines, blue has 3 lines, and bottom green has 2 lines. This is all bordered by some black stripes and borders, and the backing is black. I used black double-fold bias tape to finish the edges.


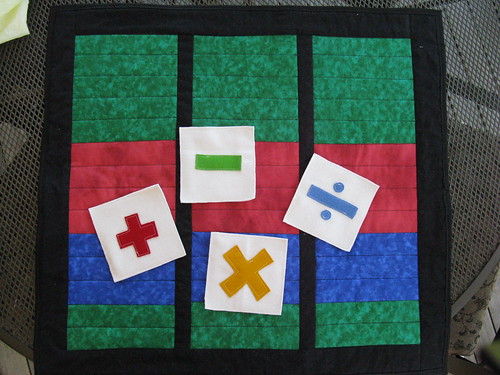
I also made 5″x5″ operator squares out of cream colored wool felt, with the various colors for plus, minus, multiply and divide. These colors are specific to the Montessori lessons, as I understand it from my teacher.


You use the mat with the golden bead materials. For example, a child would pick a card with a number on it like 3,456. In the top green square, the child would place 3 thousand cubes. In the red square, the child would place 4 hundred pieces. In the blue square, the child would place 5 tens, and in the small green square, the child would place 6 beads. Then, from this basis, the child can add and subtract. The black border separating the second and third rows acts as an equal sign.

I’m not a Montessori teacher, so I’m not sure I’ve even explained this very well (or correctly)! The article in the magazine (conveniently their sample issue right now) explains it much better, I’m sure. But, in general, I’m very happy with how the quilt turned out and I’m excited to hear how the children enjoy using it this year!

I got a new even feed walking foot for my sewing machine a few months ago, and this was the first time I had used it. It’s awesome! I can’t believe I didn’t have one before! It really does feed the fabric through evenly (LOL) so that it doesn’t get bunchy, and when you get back around to where you started, you don’t have those pinches of fabric. Cool, wonder what I can quilt next?

Blueberry Scones


I promised Kim that I would post the recipe that I use for blueberry scones. It is one that I have adapted somewhat from the currant scone recipe in The Pie and Pastry Bible. The book is pricey but it’s really awesome if you like to bake. I really like how she gives you volume measures, and weight measures. You don’t see that very often.

Blueberry-Lemon Scones

1 cup (2 sticks) unsalted butter, cold
4 cups unbleached all-purpose flour (I like King Arthur)
1/2 cup sugar
2 teaspoons baking powder
1/2 teaspoon baking soda
1/4 teaspoon salt
Zest of one lemon, about 1 teaspoon
2 cups heavy cream
1 cup fresh blueberries (or frozen, but not canned)

Preheat oven to 400 degrees with a rack in the middle level.

1. Cut the butter into 1-inch cubes and freeze for about 10 minutes

2. In a large bowl, whisk together the flour, sugar, baking powder, baking soda, salt, and lemon zest. Add the butter, and press the cubes into large flakes with your fingers. Try not to handle the butter too much.

3. Mix in the cream with a wood spoon just until the flour is moistened and the mix starts to come together. Mix in the blueberries. Try to do this gently, as they tend to make the dough a little bit blue if you are too rough. Knead the dough in the bowl just until it comes together and then turn out onto a lightly floured board.

4. Lightly flour the top of the dough, and roll the dough into a 1 inch thick rectangle about 8in by 12 inches. You can use a bench scraper to try to keep the edges even. Fold the dough into thirds like a business letter, and rotate on the board by 1/4 turn.

5. Roll the dough out again into the same 1 inch thick rectangle that is 8in by 12 inches. Fold into the business letter again and rotate 1/4 turn. Do this two more times. The blueberries make the dough a bit sticky and you may need to use more flour so your dough doesn’t stick. Try not to use too much, of course. The dough won’t be as sticky if you adapt the recipe (see below) and use dried fruit.

6. On the final roll-out, try to get a nice, even rectangle. Using the bench scraper, cut the dough in half lengthwise (into two 8″ by 6″ rectangles). Divide each of these long rectangles into thirds, and then cut each of these in half diagonally to get triangles. You will end up with a total of 12 triangle shaped scones.

7. Place scones on a cookie sheet lined with parchment. I can usually fit six on a sheet. They can sit pretty close together since they rise up but they don’t expand.

8. Bake the scones for about 20-22 minutes, just until the edges start to brown and tops are golden brown. The tops should just barely give when pressed with a finger. Don’t overbake as they will continue to cook a little bit after you take them out.

9. Place a linen towel on a wire rack, and set the scones on the towel. Cover with another linen towel and let cool until warm or room temperature. The linen allows the scones to breathe so they don’t become soggy, but helps prevent them from drying out on the surface which is what would happen if left uncovered.

You can also make these with 1 cup dried cranberries and 4 tsp orange zest (2 medium oranges), or 1 cup dried cherries and 2 teaspoons lemon zest (1 lemon).

Store at room temperature in an airtight container for up to 2 days. Or you can freeze them for up to 3 months. To reheat frozen scones, heat in a 300 degree preheated oven for about 20 minutes.

Very yummy served with homemade blueberry jam! Also yummy with clotted cream, or just with butter.

Wee Folk Art Crafting Circle


Some friends of mine have started a new craft blog called Wee Folk Art. They are going to be having a monthly crafting circle where they share a free pattern, and participants make and share the item. Then at the end of the month there will be a drawing for a free crafting kit. Doesn’t that sound like fun!? This is the first month, and the pattern is for something called a Nubbie Doll. It’s a little doll modeled after handkerchief dolls. Looks not too difficult, and it will be fun to see everyone’s different interpretations of the pattern. You have to become a member of their blog to see the pattern, which is free. Check it out! I’m looking forward to making some of these as baby gifts.

Birthday Rings

I got a Spiel & Holz birthday ring last winter, and was able to use it the first time for DS’s birthday a few months ago. He was very excited about it and enjoyed playing with the figures and blowing out the beeswax candles, etc. We have the 16 hole rainbow ring, with a star candle holder for the middle. I bought the number figures for this year’s birthday and bought two additional figures. I plan on adding a new number figure and a new regular figure each year for each child.

However, on a crafting note, I just wanted to share this idea for making one yourself instead of purchasing one. I just ran across this photo on Flickr. How cool is this birthday ring?? We already have the ring, but maybe I’ll try to make some figures for next year’s birthdays instead of buying them.

Three Sisters Toys has a nice write-up on using birthday rings in your family celebrations.

Blueberry muffins

Lori asked about the recipes that I was using to make all of these yummy blueberry things, so I thought I would share my favorite blueberry muffin recipe. These are quite yummy, nice and moist for several days. I have adapted the recipe from The New Joy of Cooking (a book that I highly recommend should be in everyone’s kitchen).

Blueberry Muffins
(Makes 12 regular-sized muffins)

2 cups all-purpose flour
1 Tbsp baking powder
1/2 tsp. salt
1/2 tsp. cinnamon
2 large eggs
1 cup milk
2/3 cup packed light brown sugar
8 Tbsp (1 stick) warm, melted unsalted butter
1 tsp. vanilla
1-1/2 cups blueberries (fresh or frozen)

Preheat oven to 400 degrees with rack in center position. Grease a standard 12-muffin tin.

Whisk together in a large bowl the dry ingredients (flour, baking powder, salt and cinnamon).

In another bowl, whisk together the eggs, milk, brown sugar, butter and vanilla. Add this to the flour mixture and lightly mix together with as few strokes as possible. Do not overmix, lumps are good! Lightly fold in the blueberries, trying not to smash them too much.

Divide the batter amongst the muffin cups. Bake until a toothpick inserted into 1 or 2 muffins comes out clean. My oven takes about 22 minutes for full muffin cups, but keep an eye on it! Let cool a few minutes in the pan before removing from the pan. Cool on a wire rack (or serve warm! Yum!). Store any uneaten muffins in a ziploc bag, or you can also freeze for up to a few months. Just let them thaw at room temperature.

My scone recipe is from Pie and Pastry Bible. This is an awesome book if you like to make pies or other pastries. It really is informative as to the hows and whys of baking, so if you are a baking dork like me and like to know that stuff, then this is a great book. In any case, I use the scone recipe from this book and it makes the most amazing scones. They are not hard as a rock, and you can even eat them for up to 2-3 days. The key is in the technique which is one that I’ve never read in another recipe. Most recipes have you roll out the dough, cut and bake. This recipe has you roll it out once, fold in thirds like a letter, rotate 1/4 turn, roll out again, fold in thirds, etc….four times. This technique creates layers in the pastry which is why it turns out so moist (lots of great butter chunks in there!).

The recipe is for currant scones, but I’ve adapted it for cranberry-orange scones, lemon-cherry, and this time, I used lemon and fresh blueberries. The fresh blueberries were a bit problematic in terms of rolling it out (sticky!), but it worked out alright. It’s much easier with dried fruit though. For the lemon-cherry, I use about 2 tsp of grated lemon rind (zest of 1 big lemon) and 1 cup of dried cherries. Similarly with the blueberry, I used 1 cup fresh blueberries and the zest from one lemon.

I’m not going to post the recipe because of copyright issues and I’m not sure it’s okay if I’m copying it? Anyone know?

Blueberries


Blueberries, originally uploaded by tinasquirrel.

We have been on vacation in Downeast Maine / Canadian Maritimes. We collected lots and lots of stones from the beach and even found a bunch of sea glass. And on the way home, we stopped on the side of the road and bought 20 Pounds of wild Maine blueberries. Yum.

Now what does one do with 20 pounds of blueberries?? Well, so far, I have canned 20 jars of blueberry jam, made one killer blueberry double-crusted pie, lemon-blueberry scones and blueberry muffins. DH made blueberry ice cream and is trying out some blueberry vinegar. I have individually frozen about 2 quarts, and I still have two quarts left in my refrigerator that I need to do something with. I think I will just freeze them for later use.

It was the first time that I had ever made jam, and the first time that I ever used a boiling water bath canner (is that what it is called??). In any case, it was easier with the second batch, and I’m excited to do some more canning as more vegetables/fruits come in. Hopefully, our tomatoes will start turning red soon!

My cool picture mosaic seems to be getting cut-off, but in my HTML-ignorance, I have no idea how to fix it. Sigh. Ah well, we can’t all be perfect, right? If you click on the picture, it will take you to Flickr where you can see the whole thing. And yes, that is a huge geodesic dome in the upper right that looks like a giant blueberry. It’s Wild Blueberry Land!