Llama Pillow

He-l–l–o–!?  No, I didn’t fall off the face of the earth.  But, I did get a new job, which has taken some getting used to.  I’ve worked out of my house for the last 12 years, and while the new job is absolutely awesome, it’s in an office and I’ve been trying to get used to not being home all day.  I used to be able to take breaks by throwing in a load of laundry, etc.  It’s made the nights and weekends a bit more busy, as I’m sure everyone perfectly understands!

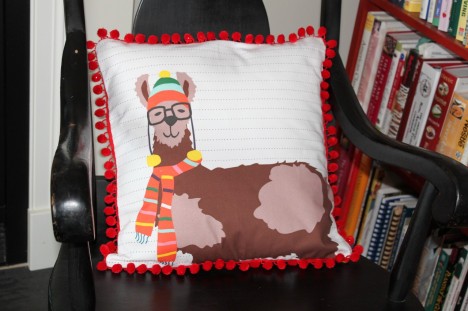
I picked up the cutest pillow panel from Laurie Wisbrun’s Etsy shop a few months ago (there’s still some left in stock!).  My friend loves alpacas and llamas, and I knew I wanted to make her a pillow with it.  So, here it is!  The backing is some fabric from my stash, which I think looks great with it.

Llama Pillow

Back of llama pillow

The back is a simple envelope closure.  I’ve never sewn with the pom pom trim, and it’s not easy!  I also put it on backwards, but my friend doesn’t care.  I did read a tip (after having made the pillow of course) that it is easier to deal with the pom poms if you first sew it onto the front in position (using a smaller seam allowance that will end up being hidden), and then sewing the pillow together.  In essence, basting it into place.  I’ll do that next time.

Nature Walk Pants

I made the Oliver+S Nature Walk pants back in November at a super-awesome workshop with Liesl Gibson and hosted by Alewives Fabrics.  It was great to meet Liesl and the class was so informative.  I came home with these Nature Walk pants for my 8yo (made the size 10) but I had cut the elastic a bit too large and they didn’t fit him.  So, in Tina fashion, instead of opening the seam and cutting the elastic, I procrastinated long enough that 4 months later, they miraculously fit!

He is holding a Bowser figure from Mario Chess in case you are wondering

We are going to use them as pajama pants since I don’t really see my 8yo wearing these to school.  They have a nice yoga style waistband though and seem super-comfy.  I haven’t made the pullover yet, but I’d like to give it a try once I make some headway into my Works-in-Progress from 2010.

So, in an attempt to make some of that headway, I started sewing the other three pairs of nature walk pants that I had cut and ready.  When I cut the first two pairs (one in 10 for K and one in 7 for J), I neglected to flip the pattern piece to cut the legs opposite (one right and one left…hello!?).  So, at the class, I had to cut the other leg, and I ended up with two pairs of each. Thankfully, I had bought extra fabric!  (Fabric is a cheap score from the infamous Mardens.)

As I was sewing the pants this morning however, using my serger that I have very little experience on, but I’m trying to learn, I made the mistake of pinning as I was sewing the crotch area.  And one of the pins got too close to the upper knife.  EEK!!!  Flying broken piece of knife!  I don’t recommend it.  So, now the knife is broken, a new one has been ordered, and serger is out of commission.  I can finish them with my regular sewing machine, so I think I might do that this afternoon.  Liesl did a great job in the class teaching us how to sew knits with a regular sewing machine.  No, you don’t need a serger!  But it does make it a lot easier…

Unless you have broken sharp metal pieces flying through the air…

Holiday Place Mats

Well, I started these sometime in early December, but got side-tracked by Christmas and was not able to finish them before the holidays.  I am trying to finish up my works-in-progress from last year before I get too engrossed in new things.  (Hard to do with my short crafting-attention span.)  One down!  37 to go!  No, just kidding, what I would like to finish before moving on to other things are my Amy Butler Daisy Chain quilt for our bedroom, the house appliqued tree skirt (from Fat Quarterly’s Holiday edition) which is sitting on my ironing board and ready to be quilted, the knit Nature Walk pants from the Liesl Gibson workshop last November (1 of 4 pairs completed), and the Doodle Stitch-Along stitching and quilt (2 of 4 blocks complete).

For these place mats, I just cut out the various shapes, stitched them together.  I didn’t bind them traditionally, instead just put down the batting rectangle, then the backing right side up, then the top right side down.  Stitch around, leaving about 4 inches to turn it.  Turn, poke out the corners with a chop stick.  Press well.  Stitched along the bottom rectangle, close to the seam on each side (2 rows of stitching).  Then the same along the seam between the two top rectangles.  Then, top-stitch all the way around the outside, closing up the open hole from turning it as you go.  Easy-peasy!  And now to put these away until next December when I will seeing my new place mats!

Up close picture of my basic quilting

In the meantime, of course since I can’t resist, I have started/completed a few other projects.  I made two Kidlet wall pockets from JCasa’s free pattern using some burlap with the Echino bicycle fabric.  For my friend who loves her bike!  The inside is lined with some Kona cotton in a teal color.  Super cute!

Kidlet

And made an absolutely lovely visit to Halcyon Yarn in Bath, Maine (AMAZING place!) and picked up some gorgeous yarn to make their Family Favorite hats for the boys.  My first knitting project!  We’ll see how it goes.  I’m on row 5 and doing alright so far.

And that’s not even everything!  I had better get my little crafting fingers working!

Craft Hope Project 11

I host a monthly crafty group of friends here at my house.  Usually we just hang out and work on whatever projects we have going.  It’s great for getting together, getting feedback on what you are working on, learning new skills, etc.  And of course, there is always yummy food to be served!!  Well, I saw the latest Craft Hope Project 11 announced awhile back, and ran it by everyone as to whether we’d like to spend one of our monthly nights working on the Craft Hope project.  Everyone was very Gung-Ho!  So, all supplies were purchased, I did a few prototypes of the drawstring bag and owl plush stuffie, and plans were set into motion.

Craft Hope’s Project 11 was for Konbit Sante, a Haitian aid organization headquartered here in Maine. They run a health partnership on the north side of the island in Cap-Haitien, Haiti’s second largest city. Health statistics in Haiti are pretty scary.  1 in 8 children will not live to the age of five.  5…  Maternal mortality rate is 1,400 for every 100,000. Only 1 in 10,000 Haitians has access to a physician.  Project 11 centered upon birth delivery kits that trained birth attendants will have on hand to use in their deliveries.  The kits contain the most basic of supplies – alcohol wipes, soap, hand sanitizer, latex gloves, string, and plastic sheeting.  Then for our special Craft Hope kits, we were also including a handmade flannel receiving blanket, an infant-appropriate stuffed toy, and all wrapped up in a handmade drawstring bag.

We met last night, and had a great time making up 10 kits for Konbit Sante to deliver to Haiti. We were up late, but they all got done because of some amazing work by my awesome crafty friends!  (And even those who claim that they are not so crafty were definitely up to the task.)

Working hard, after eating a yummy, fortifying dinner, of course. (Our friend Hilary had to leave early but did great work on the blankets!)

The medical supplies were easily obtained at the dollar store and the grocery store, and the hubby picked up the plastic sheeting from our local hardware store in the paint section (4mil was requested).  The sheets had to be 4′ x 3′, so we bought a 3′ wide roll and just had to cut off the 4′ lengths.

I have a serger (that I will admit to only using about 3 times, and I really had no clue how to thread it).  My friend brought hers as well, and I took the opportunity to learn how to thread my serger!  The sergers made quick work on our 10 receiving blankets.  They were just made with two layers of flannel, serged together.  We used a bowl to make rounded corners to follow when serging which made things easier.

Flannel receiving blankets

For the drawstring bags, I looked up a few different tutorials and combined them into something quick, practical, but durable.  The edges of the drawstring casing are folded over and sewn so they won’t fray.  And we made french seams on the inside, both durable and attractive.  I used a piece of 16″ by 32″ cotton, folded in half to 16″x18″, which was plenty big for the items we were placing inside.  Make sure the casing is wide enough to fit the two layers of string that go through (in opposite directions).  If it’s too tight, then the drawstring doesn’t open and close as well.  We used 1/2″ cotton twill tape (totally cleaned out Joann’s supply, should pre-order it online next time since Joanns doesn’t stock more than one reel at a time) and made the casing somewhere between 1″ and 1.25″ (we eye-balled).

For the owls, I saw a picture on the Craft Hope website of some owls that someone else had made.  They looked like a rather easy shape, so I just created my own drawing of an owl shape to use as a template.  We cut them out of fleece in different colors.  Sewed on the eyes and nose first with a small zig zag stitch, then with right sides together, sew around, leaving a space to turn.  Turn it inside out, added some ribbons for feet, and stuffed and sewed closed.  The ribbon feet were a bit difficult to add because I forgot to tell my friend the little trick that I had figured out.  Oops!  Things were a bit hectic with everything going on.  You fold the ribbon loops and sew them to the seam in the open area where you are stuffing, on just one side of the seam.  Then, stuff the owl.  And then sew the opening closed (we just did it on the outside for quickness, but you could also hand-sew it closed).  It’s easier to sew the hole closed if the ribbons are already securely attached, and it also gives them extra security as well.  I would say that the owls are very easy to make. The fleece is a little harder to manipulate than the flannel that I used initially in my prototype since it’s kind of stretchy.

I am very excited to mail out our 10 kits tomorrow!

All boxed up!

Craft Hope

On Saturday, my monthly crafty group and I are going to put together safe-delivery kits as part of the current Craft Hope Project 11.  I am very excited to finally participate in one of their projects!  Deadline is fast approaching (March 1), but the recipient organization – Konbit Sante – is located about an hour away from here, so if I mail the package on Monday, they will receive it on Tuesday.  If you have not yet heard of Konbit Sante, then PLEASE click on the link.  They have been doing amazing work in Haiti for a long time.  You can read about the project from Konbit Sante’s press release here as well.  Only 1 in 10,000 Haitians have access to a physician.  1 in 8 children die before the age of five.  The maternity mortality rate in Haiti is 1,400 for every 100,000.  These kits are a small step in a safe delivery.  I am not sure how many we will be making on Saturday.  My goal right now is 10.

Sewing Knits with Liesl Gibson of Oliver+S

Me and Liesl!

I had the most amazing time on Saturday taking a sewing knits class at Alewives Fabrics with Liesl Gibson of Oliver+S.  It was awesome!!  Liesl is sweet and amazing and fun.  There were only 12 students in the class, and we all got a lot of hands-on instruction on the best ways to sew knits with our particular sewing machines (no sergers here!).  I ended up using a stitch that I never would have thought of using on my own.  I made the Oliver+S nature walk pants.  Most of the students in the class were making the hopscotch shirt/dress.  They all turned out great, and the City Weekend knits are absolutely gorgeous.

My friend's hopscotch dress made with some Patty Young knits

It was a long day, but I decided to stay for the Q&A with Liesl that was going on that evening.  Fun!  She showed us the proofs for her new book, “Little Things to Sew” coming out in February (I’m reserving a signed copy from Alewives), as well as the new fabric collection coming out this spring.  The book is darling!  I can’t wait to make the little felt mittens as a gift for some lucky baby/toddler, and I have a feeling that J is going to *need* the penguin backpack.  The Little Red Riding Hood cape pattern looks adorable.

You can check out more pictures from the day on Rhea’s Alewives Girl blog.

Here are the knit pants that I made.  I made a size 10 (pattern goes to 12), and since I didn’t have K there to try them on, they ended up a bit big in the waist.  Even though I measured his waist twice before I left!  No worries though because Liesl showed me how to open up the seam and adjust the elastic if I needed to.  The fabric is just some interlock that I picked up for cheap at Mardens.  They are just going to be “around the house” pants, but they would be super-cute as pajama pants with the lettuce hem that Liesl describes on her blog.  Or very cute underneath a dress/tunic.

Nature Walk Pants

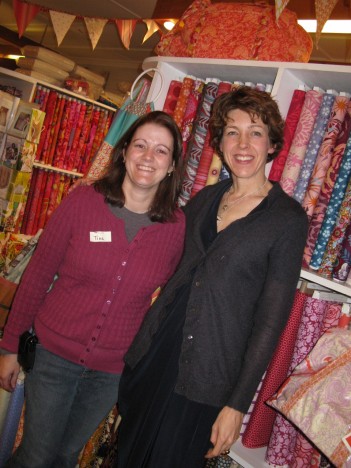
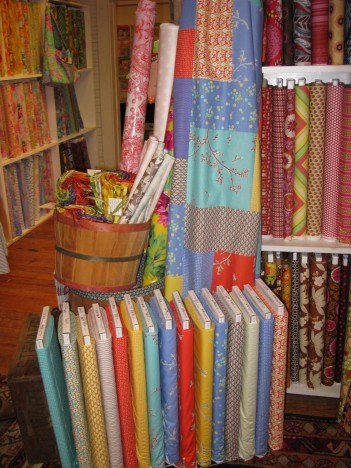
And if you are ever anywhere near midcoast Maine, you must take a road trip to visit Alewives.  It is the best shop!  I only wish it were closer to my house.  (Maybe it’s good that it’s not.)  Of course, I couldn’t leave without a little shopping.  I picked up a 20 fat quarter set of the new Anna Maria Horner Innocent Crush collection and some of the new Innocent Crush velveteen which is absolutely gorgeous (just some fat quarters, I think I am going to make a pillow).  I also got some Christmas fabrics that I’m going to use to make some of the placemats in the Quilting Arts Holiday book designed by Alissa Carlton of Handmade by Alissa.

It was an excellent day!  Here, check out the shop.  Don’t you just want to browse in there forever???

Alewives Fabrics

Alewives Fabrics

Alewives Fabrics - Turning Twenty Quilt in City Weekend on display

Plants vs. Zombies Halloween costumes

We are going with a Plants vs. Zombies theme this year.  For anyone who hasn’t played this highly-addictive and simple game yet, you must try it!  The boys love it.  So, they decided to be Plants vs. Zombies this year.

K is going to be a zombie.  He initially wanted to be the “football zombie” but I was hesitant about the helmet/pads thing and where to get those items, so I convinced him to be just a regular zombie.  For some reason, the zombies look like business executives.  So I bought him a brown corduroy blazer from Gymboree on clearance, and a red tie (that I figure we can re-use for some event at some point in time).  Now, he needs the white shirt and pants.  Hmm…I’m still working on those, but I saw this great idea over on Betz White’s blog for putting “zombie skin” underneath the torn pants.  So, I’m going to try something out with that.

J decided to be a peashooter.  Initially, he wanted to be a hypno-shroom, but I thought that might give the wrong impression (lol) and the idea of making a mushroom costume seemed a bit daunting.  Of course, a peashooter costume wasn’t probably much better.  It actually came together rather well.  First, we made a hood out of dark green fleece from a random Halloween pattern that was supposed to be for an animal jumpsuit with a hood and collar.

Now onto the peashooter part.  Here is the foam model that I used to glue the green fleece to make the head.  It’s a foam craft ball plus an egg-shaped one that I picked up at Michael’s and then trimmed off some sides, and glued together with tacky glue.  Thanks to my friend Katie for suggesting foam and glue!  I had visions of elaborate plushie designs at first.

I glued the fleece onto the egg-shape first going around.  Then, I glued the overlap onto the front piece, and then covered that up with a black circle of felt.  Then I made this random curved shape that I put around the top portion, and glued it around the top edges, but then hand-sewed it down onto the hood.  I couldn’t use the machine because the big foam under-structure was in the way.

I also added velcro to the chin portion of the hood and collar so that it would close tightly around their heads and keep the peashooter from being wobbly.

I added some leaves to the hood collar.  The leaves have a pipe cleaner through the middle to give them some sturdiness, and to help them bend.  It’s just two layers of fleece, with the pipe cleaner up the middle vein, sewed down on each side of the pipe cleaner, then sewn around the outside, and some random sewing through the middle to look like veins.  Then I just tacked them down onto the hood with a lot of zig-zag stitches.

Before adding the eyes

Then, added eyes and a little leaf on the back of the head.  Eyes are just black and white felt that I glued on.  Leaf on the back was just sewn, right-sides together on three sides, turned back inside-out, and stuffed with polyfill.  Sewed up the bottom, and hand-sewn onto the back of the hood.

Then, I made a brown poncho using this tutorial to be the “flower pot”.  Hooray!  It turned out so cute.  We also bought some green foam small balls (a bag of six) just for throwing around and pretending to be peas.

I’ll share the zombie costume later this week when it comes together.

Sweet Dress in action

You can check out the Leila & Ben Sweet Dress that I made for my niece in action over at today’s post on Wee Folk Art.

Full dress, made with fine wale corduroy

Cute shirt to go with Cute skirt

I appliqued a t-shirt from Target to match the cherries pleated skirt.  Didn’t it turn out cute?

KCWC – Days Five, Six and Seven

Well, I didn’t get as much sewing done as I would have liked but I was pretty productive for the Kids Clothing Week Challenge. But that was because we were at the MOFGA Common Ground Fair all day on Sunday!  We love the fair.  This is not your typical scary-amusement-rides-and-gross-food county fair.  No rides here, unless you count the $2 discount on admission you get for riding your bike into the fair.  Lots of displays on traditional crafts, huge fiber extravaganza, green living displays, spinning wheel demonstrations, rabbits, chickens, goats, alpacas, horses, and lots and lots of organic food.  And of course, the kid’s favorite, cardboard sledding!

Cardboard sledding at CGF

I always love to take pictures of all the yummy yarn.  I restrained myself this year and didn’t buy any fiber at all!  But I just have too much of it here in my stash and I need to use and organize it all before I can buy more.

Yummy hand-dyed yarn

The little pleated strip skirt is almost done, and hopefully I can knock it out today.  Just needs the ribbon hem and the waistband elastic.  I finished the Leila and Ben Sweet Little Dress in corduroy this morning.  I added a pocket using the pleated pocket tutorial from Made by Rae.  Because really…how can you not have a pocket to hold your little treasures??  The pattern only goes up to size 5 (bigger sizes are in the works from Leila and Ben) and I needed a size 6, so I just enlarged the pattern a little bit.  Made it a big longer and a little bit wider, trying to use the same dimensions as the other sizes.  And I added a little bit of length on the neck and sleeve elastic.

Full dress, made with fine wale corduroy

Pocket close-up

It’s hard to see the pocket there in the picture above because it’s made with the same fabric.  But, trust me, cute and just a little puckery to make it easy to get your hand in there.

Neckline close-up