Planting the Garden, Springtime in Maine

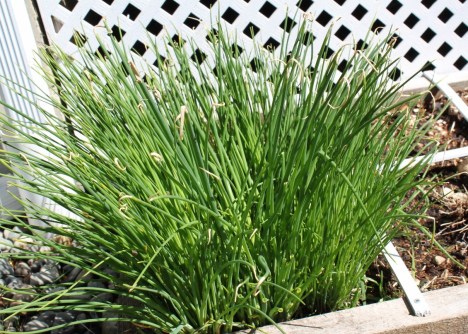
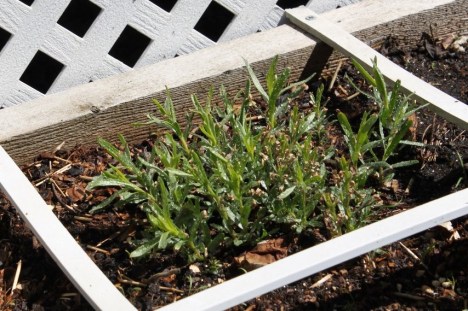
We have had some amazing Spring weather for the last two weeks.  Beautiful, sunny, highs in the 60s.  But not a drop of rain until last night.  So, I planted all of my “early spring” veggies the last week of April, and have been diligently watering them.  Sugar snap peas, spinach, arugula, various lettuces, are all in the ground and sprouting.  Our herb raised garden has quite a few plants growing in it from last year — love that — and the chives, tarragon and oregano all look amazing.

Spring chives

Spring chives

Tarragon, planted from cuttings in 2012

Tarragon, planted from cuttings in 2012

I also discovered dill the other day that was not meant to be there.  That’s okay!  I transplanted it to a good square and we’ll see how it goes.  We have also been doing our spring chores because of the great weather, and I painted our entire front porch (back breaking work with something like 75 little spindles to paint, some of which are located behind prickly rose bushes), and Hubby cleaned and sealed our porch and decks.

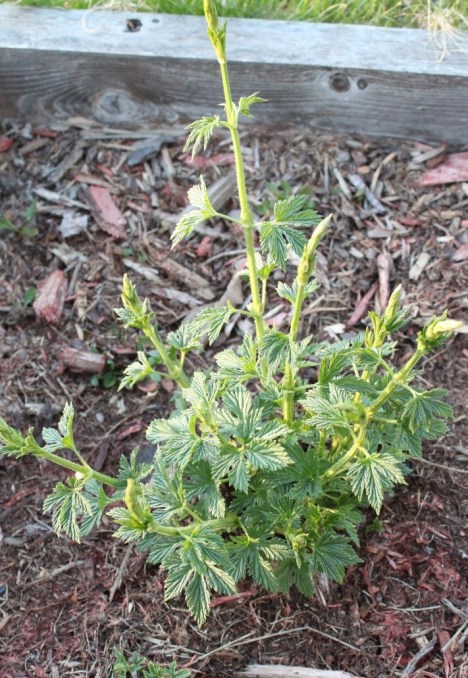
Our hops plants are growing like….hops.  I think they’ve grown at least 8 inches in the last 3 days (or it seems that way).

Hops-Nugget-Spring-2013

Hops-Nugget-Spring-2013

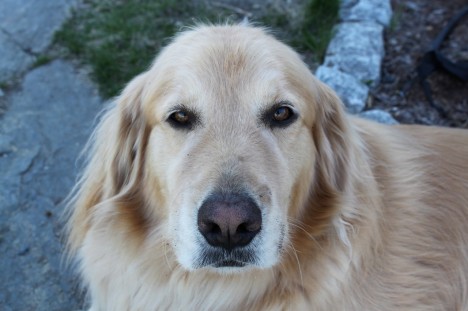
The dogs are enjoying the lovely Spring weather too.  Hamp is 4.5 and finally settling down a bit.  Magnus turned 13 a few months ago, but is still getting around well.  I think Hamp keeps him feeling young a bit.  Even when he has to steel himself to go up the stairs at bedtime.  I think his old bones are happy it’s Springtime.

Magnus

Magnus

Hmm...Hamp, what's that dirt on your nose?  Digging in the garden already?

Hmm…Hamp, what’s that dirt on your nose? Digging in the garden already?

Blueberry Pie

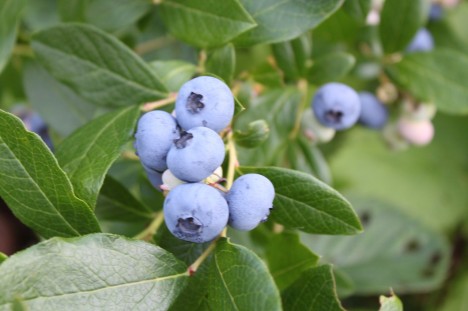
Blueberries

Blueberries

Who doesn’t love these little balls of juicy, antioxidant-filled, goodness??  The boys are funny.  They will only eat blueberries from our backyard bushes.  They don’t like any other kind.  I guess they taste better when they are still warm from the sun.  We have two high bush blueberries in a backyard berry patch, as well as several raspberry bushes.  We used to have strawberries there as well, but the raspberries have taken over.  We planted some new strawberries this spring, so we’ll see if we get any more next summer from the new plantings.  But, I think we are going to have to re-locate the strawberry patch.

Blueberry / Raspberry patch

Blueberry / Raspberry patch. The frame and net is so the birds and deer won’t eat our berries before we have a chance to pick them!

Our blueberries are hitting their stride, and we picked almost three pounds this past weekend.  We probably have another three pounds still ripening on the bushes.  Mmm…now what to do with those yummy blueberries??  Usually I make lots of muffins and quick breads with them, or eat them fresh or in yogurt/oatmeal.

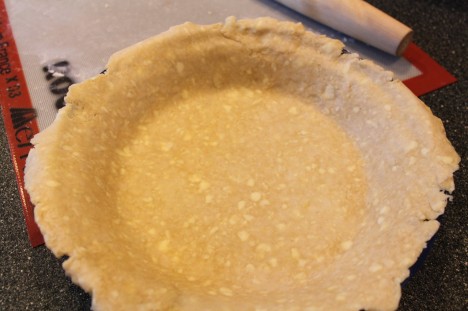
The other thing I do with blueberries is make pie and jam!  However, we don’t use our backyard high-bush berries for that.  I buy Maine wild blueberries (AKA low-bush) for that from local sources.  My favorite recipe for blueberry pie is from Cook’s Illustrated.  I use their pie crust for all of my pies.  It’s different than other pie crusts in that it uses vodka as part of the liquid.  The addition of the vodka allows the dough to be moister, and thus easier to roll without breaking.  However, then the vodka evaporates when it cooks, and you end up with a flaky, tender crust.  Unfortunately, the raw dough tastes sort of icky, but the final product is excellent!  (That’s okay, dissuades the dough-snitches.)  The other thing that I love about the CI blueberry pie recipe is the addition of a grated granny smith apple.  It disappears into the fruit and you don’t even know it’s there, however it adds a good amount of pectin which thickens the pie without the gumminess that can occur if you use too much tapioca or cornstarch.

Pie crust ready to be filled and baked. Look at all the buttery goodness!

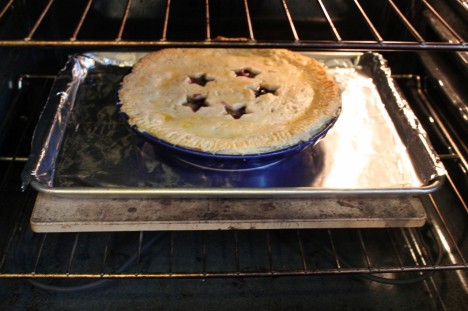
Into the oven!

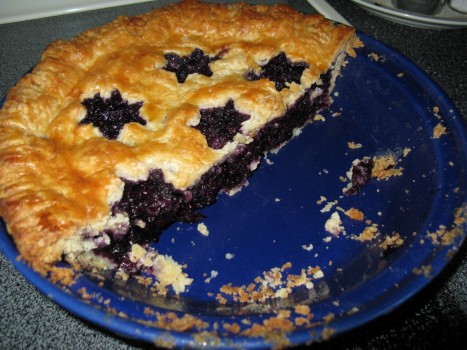
Blueberry Pie

I’m not the best pie crust shaper, so I like to think of my pies as “rustic”.  And rustic sure is tasty!

Blueberry Pie with Vodka-Crust

(Cook’s Illustrated)

Ingredients

Pie Dough  
2 1/2 cups unbleached all-purpose flour (12 1/2 ounces), plus more for work surface
1 teaspoon table salt
2 tablespoons sugar
12 tablespoons cold unsalted butter (1 1/2 sticks), cut into 1/4-inch slices
1/2 cup vegetable shortening, cold, cut into 4 pieces
1/4 cup vodka, cold
1/4 cup cold water
Blueberry Filling  
6 cups fresh blueberries (about 30 ounces)
1 Granny Smith apple, peeled and grated on large holes of box grater
2 teaspoons grated zest and 2 teaspoons juice from 1 lemon
3/4 cup sugar (5 1/4 ounces)
2 tablespoons quick-cooking tapioca, ground in a spice grinder to a powder
pinch table salt
2 tablespoons unsalted butter, cut into 1/4-inch pieces
1 large egg, lightly beaten with 1 teaspoon water

1. For The Pie Dough: Process 1 1/2 cups flour, salt, and sugar in food processor until combined, about two 1-second pulses. Add butter and shortening and process until homogenous dough just starts to collect in uneven clumps, about 15 seconds; dough will resemble cottage cheese curds and there should be no un-coated flour. Scrape bowl with rubber spatula and redistribute dough evenly around processor blade. Add remaining cup flour and pulse until mixture is evenly distributed around bowl and mass of dough has been broken up, 4 to 6 quick pulses. Empty mixture into medium bowl.  (TINA’s NOTE:  I put my cut-up butter/shortening in the freezer on a plate for about 10 minutes before using it just to make sure it’s super-cold.)

2. Sprinkle vodka and water over mixture. (TINA’s NOTE: mix water and vodka and put in the freezer for about 10-15 to get super-cold.  The vodka will help the water not freeze if leave it in there a bit longer.) With rubber spatula, use folding motion to mix, pressing down on dough until dough is slightly tacky and sticks together. Divide dough into 2 even balls and flatten each into 4-inch disk. Wrap each in plastic wrap and refrigerate at least 45 minutes or up to 2 days.

3. Remove 1 disk of dough from refrigerator and roll out on generously floured (up to 1/4 cup) work surface to 12-inch circle, about 1/8 inch thick. Roll dough loosely around rolling pin and unroll into pie plate, leaving at least 1-inch overhang on each side. Working around circumference, ease dough into plate by gently lifting edge of dough with one hand while pressing into plate bottom with other hand. Leave dough that overhangs plate in place; refrigerate while preparing filling until dough is firm, about 30 minutes.

4. For The Filling: Adjust oven rack to lowest position, place rimmed baking sheet on oven rack, and heat oven to 400 degrees. Place 3 cups berries in medium saucepan and set over medium heat. Using potato masher, mash berries several times to release juices. Continue to cook, stirring frequently and mashing occasionally, until about half of berries have broken down and mixture is thickened and reduced to 1 1/2 cups, about 8 minutes. Let cool slightly.

5. Place grated apple in clean kitchen towel and wring dry. Transfer apple to large bowl. Add cooked berries, remaining 3 cups uncooked berries, lemon zest, juice, sugar, tapioca, and salt; toss to combine. Transfer mixture to dough-lined pie plate and scatter butter pieces over filling.

6. Roll out second disk of dough on generously floured (up to 1/4 cup) work surface to 11-inch circle, about 1/8 inch thick. Using 1 1/4-inch round cutter, cut round from center of dough. Cut another 6 rounds from dough, 1 1/2 inches from edge of center hole and equally spaced around center hole. Roll dough loosely around rolling pin and unroll over pie, leaving at least 1/2-inch overhang on each side.  (TINA’s NOTE: I like to use mini shaped cutters like leaves, flowers or stars.)

7. Using kitchen shears, trim bottom layer of overhanging dough, leaving 1/2-inch overhang. Fold dough under itself so that edge of fold is flush with outer rim of pie plate. Flute edges using thumb and forefinger or press with tines of fork to seal. Brush top and edges of pie with egg mixture. If dough is very soft, chill in freezer for 10 minutes.

8. Place pie on heated baking sheet and bake 30 minutes. Reduce oven temperature to 350 degrees and continue to bake until juices bubble and crust is deep golden brown, 30 to 40 minutes longer. Transfer pie to wire rack; cool to room temperature, at least 4 hours. Cut into wedges and serve.

Even better….serve with ice cream!

Blueberry Pie, recipe from Cook’s Illustrated, July/Aug 2008, Issue 93.  See how dense the filling it?  Not runny at all.

Thai Basil Pesto with Shrimp and Fish

We planted Thai Basil in our herb garden this year for the first time.  When we came home from vacation a few days ago, we noticed that it had exploded.  Mmmm…basil.  We also have the standard Italian basil in the garden which we plan to make pesto with, so we said to ourselves, why not make pesto with the Thai Basil too?  All credit for this yummy dish goes to the Hubby who did a little perusing of our cookbook collection and made something up.

Thai Basil Pesto with Grilled Shrimp and Fish

Pesto:

3/4 cup unsalted roasted peanuts
Juice of 3 limes
Hot Peppers (see note)
2 cloves of garlic, minced
1 in. fresh ginger, peeled and minced
2 T. fish sauce (nam pla)
1 tsp. kosher salt
1 T. sugar
2 cups Thai Basil leaves
1 cup mint leaves

Additional Ingredients:

1 package of buckwheat noodles (Soba)
1 pound of raw shrimp, peeled and deveined with tail removed
1 fish filet (we used haddock, about 3/4 pound)
Some vegetables to add to stir fry (we used leftovers in the fridge – snap peas and cauliflower)
Olive oil, salt and pepper

1. Prepare the pesto sauce.  You really need a big food processor for this.  I suppose you could also use a blender (if your blender is more powerful than mine, LOL!).  Process all the ingredients for the pesto except for the Thai Basil leaves and mint leaves.  It will be pretty liquidy.  Add the basil and mint leaves and process (pulse in 1-second bursts) just a bit until it comes together.  You don’t want to heat/cook the basil because it will turn brown.

2. Boil the Soba according to package directions.

3. Start stir frying your vegetables in some olive oil.  We use our 12-inch cast iron skillet for stir frying because it has more surface area than our wok.  We used whatever we had handy in the refrigerator which was some leftover cauliflower (cut small) and some snap peas from our garden.

4. Meanwhile, drizzle fish and shrimp with olive oil and salt/pepper, and grill.  We used a grill basket on our charcoal grill.  It doesn’t need very long to cook, about 3 minutes per side for the fish and 3-5 minutes for the shrimp.

5. When the vegetables are ready, add in the cooked noodles, mix around, and add one cup of the pesto sauce.  Add more if necessary.

6. Turn out onto a serving platter, add the shrimp and fish on top, and drizzle with more pesto.

We had enough pesto leftover to make another smaller dish.  (It’s still in my fridge.)

NOTE: For the peppers.  You are going to have to use as many peppers as you prefer from a heat standpoint.  We happened to use 2 jalapenos and 1 serrano pepper because that is what we had.  We did not use the seeds or ribs.  It could have been a bit more spicy for us, so next time we will keep the ribs of the jalapeno and see how we like that.  It’s very much a personal preference thing.

Compost Tomatoes

Tomatoes growing in our compost bin


We just got home from a week up at Moosehead Lake (unfortunately we didn’t see any moose).  Our garden and chickens did great while we were gone due to the help of a good friend.  This “little” baby in our compost bins though didn’t need any water.  We haven’t taken care of it at all, and look what is going on!  Not sure what it is.  I think it might be a variety of a cherry/grape that we grew last year.  It started sprouting in the compost bin this spring and we just let it go.  It’s amazingly huge.  It’s not even that sunny over there.  I think it’s about 10x as large as the tomatoes that are growing in the square foot garden or the patio containers.  FUN!  I guess we have some good compost.

Our 2011 Garden

Mmm...peas

I decided to create a new page on the blog devoted to our 2011 garden plans.  I couldn’t find my garden notebook last night when Hubby and I sat down to plan the garden, and I thought putting it up on the blog might be a nice record-keeping feature (thankfully, I did eventually find it).  If you are interested, you can check it out on the tab up top, or here.

November

It was a frosty morning today.  Low of 25 degrees last night, and I had to bundle up in my winter coat, hat, scarf and gloves when I walked the dogs this morning.  Time to put away the Halloween decorations and start thinking about Thanksgiving and Christmas!  I’ve actually been thinking about Christmas for quite awhile, but I’ve mostly been doing thinking and not a lot of doing.  Time to put things into gear!  In the meantime, I need to put the garden and yard to bed, and plant some bulbs before the ground gets too hard.

I dug up my carrot crop the other day.  I planted my seeds about 3-4 weeks too late, so they are all very tiny.  But, they are so sweet and yummy.  I roasted a bunch for dinner the other night, and will probably do it again tomorrow.  I’m definitely making sure that I plant them on time next year.  Hubby built a special deep square foot box for them (4′ x 4′) which is what put us behind this year.  No excuses next year!

And before I start talking about Christmas….if you missed it last year, this Montessori practical life buttoning felt turkey was a huge hit with all the kids in my son’s Montessori school (age 3-6 classes) last year.  Think about making one for your own little one!  It was really quite easy.

When I made the second and third ones, I switched to a zig zag stitch as I went around the outside of the turkey body and the feathers, and it looked a lot better.  The face is hand-embroidered.

Also, if you are really thinking ahead, I thought I would share my wool felt advent calendar that I made two years ago.  I just *love* it!  It was so worth all the time that it took to make each individual pocket.  If you start now, you can still be done by December 1st!

The chickadee pocket is one of my favorites.

A Garden Tour

I was reading a recent post on Make and Takes about Marie’s square foot garden, and when she asked what her readers were planting, I went on and on in my post.  Hmm…it was getting a bit long.  So I decided to take a little tour through our garden tonight.  My pictures are pretty sorry.  But, hopefully tell a story.

So, let’s see, walking around the yard and by-passing the perennials because I really want to talk about edible things.  I did just plant 11 perennials last week in our front garden that I got from Fieldstone Gardens.  Maine-grown hardy perennials.  Worthy of a road trip.  Seriously.  They also do mail-order.

Last year, we planted 1.5 pounds of sunchokes that we got from Johnny’s.  They dig them up on their farm in the fall and send them off.  We were worried when we didn’t see them right away this spring, but here they are!  We planted them along the edge of a naturalized area (aka weedy marsh).  They should grow to between 5 and 10 feet!  And they produce yellow sunflowers.  Then you can eat the tuber in the fall.  Sort of like little potatoes but with better flavor.  They are also called Jerusalem Artichokes, but yet have no relation to either Jerusalem or Artichokes.

Sunchokes, aka Jerusalem Artichokes

Let’s see now, heading around to the backyard, we have our berry patch.  We had a spot of trouble with our two blueberry bushes this year, not sure what, so the hubby trimmed off a bunch of dead branches, and they look sad, but they seem to be recovering.  There are also three raspberry bushes here and a bunch of strawberries, both June-bearing and ever-bearing.

Berry patch

Mmm...strawberries

New for this year are hops.  Hubby is a long-time homebrewer.  Like longer than we should say out loud.  He has been thinking about growing hops for quite awhile, but wasn’t sure where to locate them.  They grow extremely fast and to about 20-30 feet tall, and need full sun.  He’s been avidly reading The Homebrewer’s Garden and finally decided to plant a hop plant after I casually mentioned that the play structure would make a good support.  Oops!  Did I voice that out loud??!  Right now, he’s just planted a variety called Nugget because that is what we could find locally.  He just ordered two others, a Kent Golden and Cascade, I think, from a place called Freshops.  He added that vertical support to the top of the play structure to give it some more height.

"Nugget" hops

Now, no garden tour would be complete without a quick stop at the compost bins that hubby made last year!

Compost bins

Sorry about the evening shadows here.  It’s supposed to rain tomorrow so it was now or never.

Now, onto the fun part….the vegetables!

Some patio containers for tomatoes.  Here are two that I bought as seedlings at the farmer’s market – these are Cherokee Purples and I also have Muskovich (an heirloom variety) in the square foot garden.  Also have another container with a cherry variety and basil.  And I have four more seedlings that I need to put into pots.  Lots of tomatoes this year!!

Patio tomatoes

The Square Foot Garden

We have three square foot garden boxes.  Our backyard / side yard faces South, so we made the boxes 2’x8′ and sited them along the house where we don’t have any windows.  They are filled with the “Mel’s Mix” that is outlined in the book, Square Foot Gardening.  One is devoted to herbs, and the other two are regular vegetables.  We have a trellis made of rebar and netting along most of the back of the vegetable boxes.  This year, we had to put up a chicken wire fence (annoying) because our dogs kept walking in the garden.  They like to eat the homemade compost (eeewwww!).

So, starting from the left, we have three squares of pole beans along the back (8/square).  See the trellis?  We did pole beans and bush beans the last two years, but we prefer the pole beans and they are more prolific, so skipped the bush beans this year.  Pole beans are also easier to pick.  Then in front, we have two squares of broccoli (new to us this year, 1/square), and the third square is broccoli raab (4/square).  All but the broccoli raab was directly sown in the garden (all of our seeds are from Johnny’s).  I started the broccoli raab inside and transplanted.  Doesn’t that broccoli look awesome??

Pole beans, broccoli and broccoli raab

Next along the line, we have three cucumbers along the back (planted 2/square).  There are slicing and pickling varieties.  By using the trellis, you can save a lot of space in your SFG with the cucumbers.  I started these indoors and transplanted them.  Unfortunately, I moved them around by accident, and I didn’t know which ones were which varieties.  I guess we’ll see!  And in front, we have some lettuces.  From left to right, 2 squares of arugula, and kyona mizuna.  These are planted four per square, direct sown.  Love the arugula and very prolific.  All the lettuces are actually.  You need to pick them almost every day and make sure they don’t bolt.  The more you pick, the more they grow!  yum!

Cucumbers and lettuces

Now for peas, peas, and more peas!  We have seven squares of peas planted along the back trellis, 8/square, direct sown as early as the ground can be worked.  (We were a little late, but still okay.)  These are a sugar snap variety.  In front, we have more lettuce, all planted 4/square, direct sown.  Purple mizuna (more bitter than the kyona variety), green romaine and red romaine.  I planted green romaine seeds from last year and they didn’t do well.  So I re-seeded about two weeks later, but that’s why that square looks sad.  To trellis the peas, you just need to push them towards the trellis as they start to grow that way, and they will latch on rather quickly.  Easy-peasy.  The lettuce varieties are very satisfying to grow.  We’ve been eating salad all week!

Peas and lettuce

Next up are more peas and more lettuce.  Peas along the back, and Deer Tongue (a buttercrunch type), Bibb lettuce, and Spinach (Emu variety).  The spinach is planted 9/square.

Peas and lettuce

And finally, at the end of our vegetable boxes, we have one more square of peas, and three tomatoes (all Muskovich from the farmer’s market) in the back.  And in the front, two more spinach varieties (Spargo this time), and two more tomatoes (only labeled as “patio tomatoes” at the store…hmmm…).  Spinach is direct sown early, early in the season.  The tomatoes are seedlings (I don’t seed-start tomatoes very well), and planted one per square. They will take over the entire square, but it will be okay.

Peas, tomatoes, and spinach

And one quickie shot of our herb box.  There is dill, nasturtium, wormwood, sage, parsley, thyme, and oregano.  And one tomato plant because I had an extra space.

Herb box

These are still looking a bit poky.  Hopefully they take off soon.  We planted four squares of parsley because we love to make tabbouleh so much.  The parsley went crazy last year, so we have hopes.

I hope you enjoyed my tour of our garden!  Thank you for coming by.  What are you growing?  Anything new I should try next year that you love?  We have been square foot gardening for three years, and we love it.  I highly recommend it even if you have the space for a traditional garden (which we do).  Almost zero weeding, easy to plant, easy to pick.  It’s lovely.

Seeds and Spring — and my 100th post!


I should probably do something special for my 100th post, but what am I talking about instead? My seeds! I got my Johnny’s order today and I’m so happy and excited. I can’t wait to start planting! Unfortunately the peas that I wanted were all out of stock. Boo! I should have ordered earlier. And my substitute is back-ordered but should arrive next week. They are going straight into the ground as soon as they arrive!

We’ve got sugar snap peas, snow peas, pole beans, bush beans, zucchini, yellow squash, a variety of lettuces include arugula (yum!), cukes, and four types of tomatoes. The hubby also ordered sunchokes that we are going to plant out along the power line when they arrive in the fall. If you’ve never had sunchokes (or Jerusalem artichokes as they are also called), you should try them. They are little tubers, and their look like big sunflowers. Tasty.

Looking at my itemized list here, I just realized that I totally forgot to order the herbs! Doh! I will have to rectify that tomorrow. I also picked up this very nice-looking compost crock for our countertop. We are currently using a stainless bowl, and I’d like my bowl back.


Have you read this far? I think a 100th post calls for something special, like a……GIVEAWAY! But what should I giveaway? What are you coveting that I can make you? Let me know! Birthday crown, baby blanket, free fabric, gnomes??????

Pause in craftiness

So, yes, once again, I’ve been MIA from my blog. There just hasn’t been any squirrelly craftiness going on recently! We went on an awesome trip to San Francisco for a good friend’s wedding. Of course, in addition to the actual cross-country travel, there’s the time it takes to get ready for such a trip as well as the time it takes to recuperate from such a trip.

The other reason for my lack of current craftiness has been that it is SPRING! Hooray! So, instead of being inside creating, I have been outside creating. We have a gorgeous brand new patio with fire pit (that was hired-out creating) and our square foot gardening boxes are ready for some seeds and seedlings! The seeds will hopefully go in this weekend, but we are going to wait another week for the seedlings. The last frost date is pretty late in Zone 4!

I did finish my embroidered bunny last night. I just need to wash and press it and I’ll take a picture to share. I think it is going to become the centerpiece of a small baby quilt. Also, someone on another board shared some awesome pirate gnomes that they made using my tutorial, and I will hopefully share a picture of them soon.

Has anyone ever made a sunflower play house? I just noticed some instructions in a Family Fun newsletter and I thought it looked like it could be great fun for the kids.