November

It was a frosty morning today.  Low of 25 degrees last night, and I had to bundle up in my winter coat, hat, scarf and gloves when I walked the dogs this morning.  Time to put away the Halloween decorations and start thinking about Thanksgiving and Christmas!  I’ve actually been thinking about Christmas for quite awhile, but I’ve mostly been doing thinking and not a lot of doing.  Time to put things into gear!  In the meantime, I need to put the garden and yard to bed, and plant some bulbs before the ground gets too hard.

I dug up my carrot crop the other day.  I planted my seeds about 3-4 weeks too late, so they are all very tiny.  But, they are so sweet and yummy.  I roasted a bunch for dinner the other night, and will probably do it again tomorrow.  I’m definitely making sure that I plant them on time next year.  Hubby built a special deep square foot box for them (4′ x 4′) which is what put us behind this year.  No excuses next year!

And before I start talking about Christmas….if you missed it last year, this Montessori practical life buttoning felt turkey was a huge hit with all the kids in my son’s Montessori school (age 3-6 classes) last year.  Think about making one for your own little one!  It was really quite easy.

When I made the second and third ones, I switched to a zig zag stitch as I went around the outside of the turkey body and the feathers, and it looked a lot better.  The face is hand-embroidered.

Also, if you are really thinking ahead, I thought I would share my wool felt advent calendar that I made two years ago.  I just *love* it!  It was so worth all the time that it took to make each individual pocket.  If you start now, you can still be done by December 1st!

The chickadee pocket is one of my favorites.

Embroidered Mini-Quilt

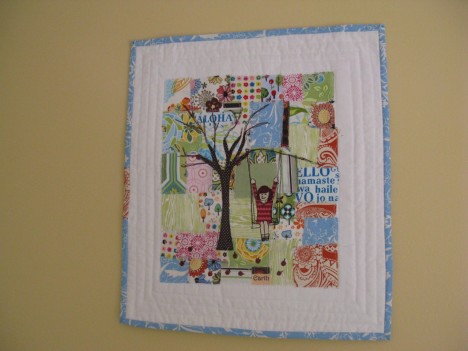
Girl on a Tree Swing Mini-Quilt

I have several tutorials that I want to try linked over in my right sidebar.  One that has been on there for quite awhile, I can finally check off! Comfort Stitching’s Girl on  a Tree Swing mini-quilt tutorial!  I wouldn’t necessarily say that it was quick and easy, but it was relatively, especially considering the huge cuteness-payoff!  The tutorial is very well-written and I had no questions as I moved through the various steps.  The hardest part was deciding what fabrics to use on the patchwork background!

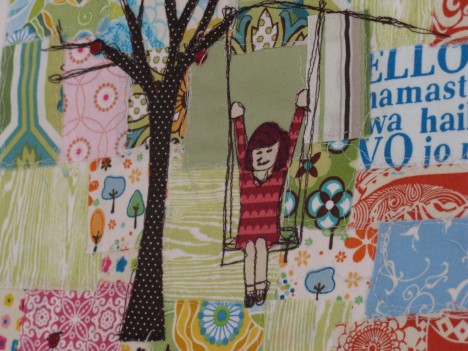
Up-close of the appliqued girl

I have been practicing my freehand machine quilting, so I feel like I did a pretty good job on that.  And by the time I finished outlining all the little patchwork squares, I was getting into a good groove for doing the sketchy stitching applique part of the tree/girl/swing.  I just did some straight line quilting around the white border area for the “quilting” aspect of it.  And I really like the binding that I chose.  (It has orange!)

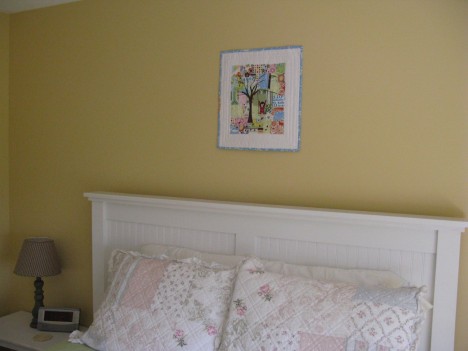
I just love how it turned out!  It’s hanging over the bed in our guest room.  It’s actually too small for that space, so I’ll probably move it to one of the side walls, but I’ll leave it there for now.

Hubby made the bed

Felt Flower Garden House Embroidery Project

I used Checkout Girl’s awesome Little Pink House tutorial that was posted on Sew Mama Sew awhile back to make this!  I didn’t break out much from the pattern, but it was my first project like this and I wanted to get my hands around it first.  Now I need to sketch something up to make something new!

My "Little Pink House"

Close-up of the flowers

The background is linen, and the felt is all wool.  I just love the spring green color of the leaves.  I can’t remember where I bought that color but I’ll have to figure it out because I love it.  The orange and aqua colors are some hand-dyed felt that I got from Felt-o-Rama.  Gorgeous colors, but the felt is a bit thin (1mm according to the website, as compared to the wool blend which is 1.2mm).  Fine for this sort of project though.  They sell hand-dyed embroidery floss to match.

Montessori Word Family House

J’s teacher showed me an idea that she got from a blog and asked if I could come up with something similar for their classroom.  Well, how can I say no to such a challenge?  **Update** I finally found the link for the original inspiration for this project at itty bitty love.  She has some examples of word family cards that the children can choose from.  Check out her blog.  Great Montessori ideas!

Word Family House

The purpose of this work is to put a word ending in the top attic window.  So there will be a card with “AT” on it for example.  Then, the child will have more cards with the “AT” ending which the child places down the right-side column of windows, cards with beginning sounds, and then objects that match the words that can be created…”CAT” or “BAT” for instance.  I’ll try to get some pictures of the work in progress once J’s teacher puts it out.

The size of the red house is about 12×12 inches, which was just the size of the pieces of wool-blend red felt that I had (purchased from Felt-o-Rama).  The white windows on the red part of the house are 2×3 inches.  I sewed those on with my machine and a straight-stitch.  So here was my process:

1) Cut out two pieces of tan for the roof.  Attached the window in the center of one piece using white embroidery floss and a whip stitch.  Then, I used a back-stitch and dark gray floss to make the window panes, and to outline the window.  I then put the two tan pieces together, sandwiched in a piece of dark charcoal (a felted sweater scrap) and used a decorative stitch to sew the roof together.

2) Cut out the main house window pieces.  I attached these to the front house piece with Heat-n-Bond Lite in order to get them to stay on securely when I was sewing them on.  I find this works better than just pinning which can cause the pieces to turn out a bit wonky by the time you are done if you aren’t careful.  Then I sewed them in place with my machine, matching thread, and a standard straight stitch.  I hand-stitched the window panes with a back stitch and dark charcoal embroidery floss.  You could put the windows on by hand with a whip-stitch but I was trying to save a bit of time with eight windows!

3) I then embellished the house a bit with the purple coneflower, grass and butterfly.

4) While watching the awesome skating on the Olympics last night, I put together the two red pieces by hand with a blanket stitch.  Stitched all the way around all sides.  I then attached the roof using a whipstitch along the bottom edge of the roof where it meets the front piece of the house.  I didn’t tack it down in the back at all.  I didn’t really feel like it needed it, but I can do that later if it turns out to need some additional support after it’s been used awhile by the children.

Purple coneflower embellishment on the house

Butterfly embellishment

This was a fun project!  I can’t wait to see it in action in the classroom.

“Not my gumdrop buttons….”

Gingerbread boy ornament

Gingerbread boy ornament

I recently ran across this pattern/tutorial on Elsie Marley’s site for a half-eaten gingerbread boy ornament, and I had to make it!  He’s so adorable!  It’s an interesting technique to sew the front cut piece onto a rectangular back piece, and then cut the back piece into the correct shape after sewing.  Worked very well.  My only hint on making this would be to stuff it a little bit when you are halfway around instead of waiting until the end.  I had a hard time getting stuffing into the far arm and leg, and it would have been easier if I had stuffed as I went along.  I also used a backstitch to embroider the year on the back of the piece.  I can’t wait to hang him on my tree when we put it up in a few weeks!

Gingerbread boy has already been a hit with J

Already being played with by J

Maine Quilts 2009

Two friends and I went to the Maine Quilt show this past weekend which is put on by the Pine Tree Quilters Guild.  Wow, fun!  I’ve never been to a quilt show before, so I don’t know how this one compares with others, but I thought it was great.  We got there at 9am, left at 2pm, and probably could have stayed longer but we were starving.  Tons of great shops, both local and from away.  My favorite shop at the show was Alewives Fabric in Nobleboro, Maine.  They had a ton of great fabric, patterns, etc.  They were also demonstrating making fabric floorcloths, which look very cool.  A few days earlier they had gotten in the Heather Ross Far, Far Away collection in the double gauze.  I have never seen the double gauze, which was intriguing.  I was also able to test out a long arm quilting machine briefly.  I can see how that would be a lot of fun if I had $10k just laying around, LOL!

I was actually good, and all I bought were a few patterns.  It was hard to pass up all that gorgeous fabric!  I think this wool applique pattern from Lakeview Primitives will be a nice wall hanging for Christmas.  It was fun to see the fabric in person, versus all the internet window shopping that I normally do.  For example, my friend bought some home dec weight fabric from Denyse Schmidt’s County Fair collection, and it was so much prettier in person than it seemed online.  She’s going to make an Amy Butler Birdie Sling with the fabric, which Alewives had displayed in their stall, and is way cute.  I didn’t realize just from looking at the pattern that the shoulder handle is really just one strap and not two.  Really comfortable.

Another shop, the Calico Basket Quilt Shop, in Windham, Maine was doing a small demonstration on making exploding pineapple blocks.  Way cool.  The next day, I made some up with a Moda Flutterby charm pack that I had laying around, and they were really quick and easy.  You take two charm squares, and sew them all the way around, facing each other.  Then, you draw two lines diagonally between each corner.  You pull up just the top fabric, and clip a tiny bit in the middle where the lines cross, and then you cut all the way along both diagonal lines up to the seam.  You fold back the resulting triangles and press.  Sew a bunch together, and voila!  These are the simple ones.  You can keep combining the squares to make more intricate ones.

Exploding Pineapples

Exploding Pineapples

I have been in a flurry of cleaning for guests and the fact that we are going to be doing a tiny home renovation project that requires me to empty out my office.  Scary.  Very scary.  So, I have several projects in the works that are not done yet.  Sigh.

I did finish another US map quickie quilt for a friend of mine.  This time I used some great state fabric that I found at Joanns in their 4th of July/holiday section for the backing.

US Map Tied Quilt

US Map Tied Quilt

I also finally created a label for the baby quilt that I finished for my friend awhile back.  So, I need to wash it and it will be done!  I’m making her older girls some tote bags, which is why I haven’t sent it off yet.  I’m using the tutorial that Skip to My Lou just posted a little while ago.

The label is just a piece of natural colored organic cotton and I embroidered the baby’s name on it.  Then, I used a fabric pen to stamp the word FOR and hand-write my name and the year.  I then just pressed under a seam allowance, and used a blind stitch to tack it onto the back, making sure to only catch the backing fabric and not the front!

Quilt label

Quilt label

Cut out tote bags and summer shorts

Cut out tote bags and summer shorts

Underneath the tote bags are about five pairs of shorts that are cut and ready to sew together.  But I’m trying to get my gifts done first!  We’ve also been having a little Maine beach fun since it finally feels like summer!

IMG_4188 (1024x768)

Water was 53 degrees that day.  Brr!

Water was 53 degrees that day. Brr!

Felted Knitting Needle Case

Felted knitting needle case from Warm Fuzzies

Felted knitting needle case from Warm Fuzzies

I have been thinking about making the knitting needle case from Betz White’s Warm Fuzzies: 30 Sweet Felted Projects for awhile.  My good friend’s birthday was a few weeks ago, and I thought it would be a perfect gift!  I used a nice wool sweater that I had picked up at Goodwill awhile back.  It was gray with a pretty orange border around the cuffs and bottom.  So, I tried to incorporate that into the design.  The project in the book has a sunflower embroidery, but I used the nest/bird embroidery that was featured in the family photo album project.  Inside is some cream, butter yellow, and orange 100% wool felt from my stash.  It came together very easily.  The directions were great and I had no issues at all.  It was a bit difficult to sew the bottom of the pocket just because of all the layers – sweater and two layers of wool felt.  I had to go over part of it a second time, but it looked fine.

Inside of case, used a decorative stitch on the flap

Inside of case, used a decorative stitch on the flap

Inside of case

Inside of case

Front of knitting needle case

Front of knitting needle case