Llama Pillow

He-l–l–o–!?  No, I didn’t fall off the face of the earth.  But, I did get a new job, which has taken some getting used to.  I’ve worked out of my house for the last 12 years, and while the new job is absolutely awesome, it’s in an office and I’ve been trying to get used to not being home all day.  I used to be able to take breaks by throwing in a load of laundry, etc.  It’s made the nights and weekends a bit more busy, as I’m sure everyone perfectly understands!

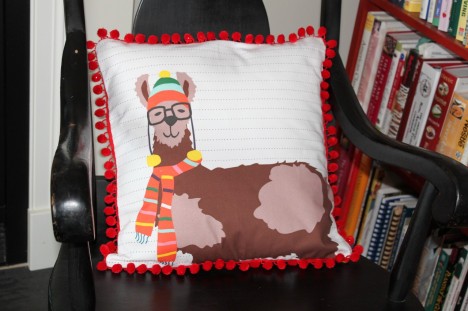
I picked up the cutest pillow panel from Laurie Wisbrun’s Etsy shop a few months ago (there’s still some left in stock!).  My friend loves alpacas and llamas, and I knew I wanted to make her a pillow with it.  So, here it is!  The backing is some fabric from my stash, which I think looks great with it.

Llama Pillow

Back of llama pillow

The back is a simple envelope closure.  I’ve never sewn with the pom pom trim, and it’s not easy!  I also put it on backwards, but my friend doesn’t care.  I did read a tip (after having made the pillow of course) that it is easier to deal with the pom poms if you first sew it onto the front in position (using a smaller seam allowance that will end up being hidden), and then sewing the pillow together.  In essence, basting it into place.  I’ll do that next time.

Innocent Crush fabric

I think I might have an idea for using up that 20 fat quarter pack of Anna Maria Horner’s Innocent Crush that I picked up at Alewives Fabrics last November!  Super cute tutorial from Film in the Fridge.  I’d like to make a twin sized quilt for the bed in my office/spare room.

Sewing Knits with Liesl Gibson of Oliver+S

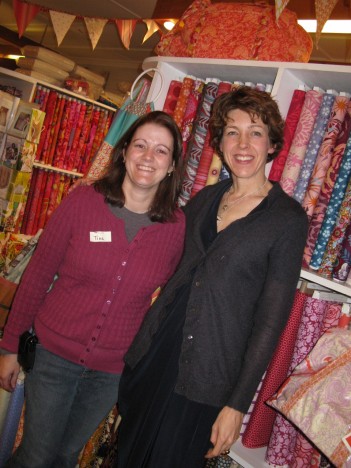
Me and Liesl!

I had the most amazing time on Saturday taking a sewing knits class at Alewives Fabrics with Liesl Gibson of Oliver+S.  It was awesome!!  Liesl is sweet and amazing and fun.  There were only 12 students in the class, and we all got a lot of hands-on instruction on the best ways to sew knits with our particular sewing machines (no sergers here!).  I ended up using a stitch that I never would have thought of using on my own.  I made the Oliver+S nature walk pants.  Most of the students in the class were making the hopscotch shirt/dress.  They all turned out great, and the City Weekend knits are absolutely gorgeous.

My friend's hopscotch dress made with some Patty Young knits

It was a long day, but I decided to stay for the Q&A with Liesl that was going on that evening.  Fun!  She showed us the proofs for her new book, “Little Things to Sew” coming out in February (I’m reserving a signed copy from Alewives), as well as the new fabric collection coming out this spring.  The book is darling!  I can’t wait to make the little felt mittens as a gift for some lucky baby/toddler, and I have a feeling that J is going to *need* the penguin backpack.  The Little Red Riding Hood cape pattern looks adorable.

You can check out more pictures from the day on Rhea’s Alewives Girl blog.

Here are the knit pants that I made.  I made a size 10 (pattern goes to 12), and since I didn’t have K there to try them on, they ended up a bit big in the waist.  Even though I measured his waist twice before I left!  No worries though because Liesl showed me how to open up the seam and adjust the elastic if I needed to.  The fabric is just some interlock that I picked up for cheap at Mardens.  They are just going to be “around the house” pants, but they would be super-cute as pajama pants with the lettuce hem that Liesl describes on her blog.  Or very cute underneath a dress/tunic.

Nature Walk Pants

And if you are ever anywhere near midcoast Maine, you must take a road trip to visit Alewives.  It is the best shop!  I only wish it were closer to my house.  (Maybe it’s good that it’s not.)  Of course, I couldn’t leave without a little shopping.  I picked up a 20 fat quarter set of the new Anna Maria Horner Innocent Crush collection and some of the new Innocent Crush velveteen which is absolutely gorgeous (just some fat quarters, I think I am going to make a pillow).  I also got some Christmas fabrics that I’m going to use to make some of the placemats in the Quilting Arts Holiday book designed by Alissa Carlton of Handmade by Alissa.

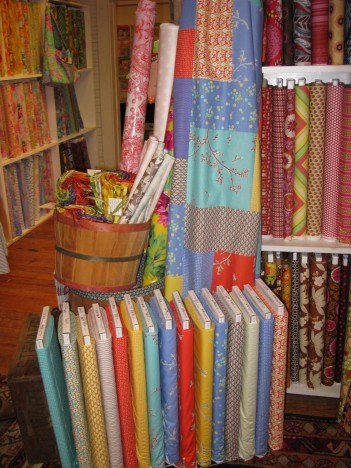
It was an excellent day!  Here, check out the shop.  Don’t you just want to browse in there forever???

Alewives Fabrics

Alewives Fabrics

Alewives Fabrics - Turning Twenty Quilt in City Weekend on display

Quilted potholders

My friend has some super-awesome chickens.  We love to visit them!  I bought some great Robert Kaufman chicken fabric from the Metro Market collection a few months ago with the thought of making something for her.  When I saw Elizabeth from OhFransson! post about the quilted potholders that she was making, I thought those would be a great project to highlight the cute chickens.

Quilted chicken potholders

The other fabrics include Fifties Kitchen from Michael Miller and Juicy Lemon from Alexander Henry.  The white on the front is Kona in Snow, and the green on the inside is also Kona, but I’m not sure which one off the top of my head.  The green woodgrain binding is from the Joel Dewberry Aviary collection.

Christmas Gifts – Fabric Baskets

I came across the Alexander Henry Good Earth fabric a few months ago, and *knew* that I needed to make something with it for J’s Montessori teachers.  The little children in costumes from around the world are adorable (called “You and Me”).  So I showed it to my friend, and we came up with a plan to make fabric baskets.  After searching around through many tutorials, we decided to use the tutorial from Pink Penguin.  It’s for a patchwork basket, but I just modified it to remove that step, and I enlarged the pattern as I wanted mine to be bigger.  Her tutorial was great and I didn’t have any problems at all.

Before I cut into the expensive Good Earth fabric, I decided to make a prototype which I gave to my friend as a little Christmas surprise.  My friend has these beautiful chickens that my boys adore, which is why I chose the chicken fabric from my stash.  It’s a home dec weight.  The top part of the basket (the red dots, which I’m almost certain is an old Michael Miller print) is just normal quilting cotton.

For the chicken applique, I cut out chickens from the bottom fabric, attached them with Heat and Bond Lite, and then did some “sketchy stitching” around the chickens (using some stabilizer underneath).  I loved how it turned out!  I wanted to keep it, LOL!

Side 1

Side 2

I increased Pink Penguin’s pattern by 25% to make this basket.  I also pieced the bottom since the fabric was directional and I didn’t want the chickens to be upside down on one side.  So, assuming that Pink Penguin’s basket is a “small” size, this would be a “medium” size.

Bottom piece (chicken) = 8″ x 12.5″ (finished size, if your fabric is directional, take this into account, I cut two pieces 4.25″ x 12.5″ and sewed them together with 1/4″ seam)
2 x Top pieces (red dot) = 4.5″ x 12.5″
Lining (also red dot) = 12.5″ x 16″
Handles (two different fabrics) = 2.75″ x 12″
* Use 2″ for the box corners in those steps

So, the chicken basket was lovely, but my friend and I decided that we wanted our Good Earth baskets for the teachers to be a bit bigger, so I enlarged the pattern again by 25% to a “Large” size.  We actually didn’t quite use these measurements in our “world kids” basket because I wanted to fussy cut the children so that you didn’t have half a head on there.  However, I did test out the original sizes by making a basket for my MIL for Christmas which I don’t seem to have a picture of.  I’ll have to remedy that.

<<EDIT>> Took a picture!  I used fabric from my stash for this, and these are from Sandi Henderson’s Ginger Blossom collection.  The bottom red stripe is the Denyse Schmidt County Fair.

"Large" size

Original “Large” sizes

Bottom piece  = 10″ x 15.75″
2 x Top pieces = 5.75″ x 15.75″
Lining = 15-3/8″ x 20″
Handles (two different fabrics) = 4″ x 15″
* Use 2.5″ for the box corners in those steps

Modified “Large” sizes for “world kids” fabric

Bottom piece  = 11.5″ x 15.75″
2 x Top pieces = 5″ x 15.75″
Lining = 15-3/8″ x 20″
Handles (two different fabrics) = 4″ x 15″
* Use 2.5″ for the box corners in those steps

We made two “world kid” baskets.  One in a red/pink tone and one in a blue tone.  J had definite ideas as to which of his teachers should get the red and which should get the blue, and he was right!  I had a hard time buying the children fabric because I couldn’t really tell what the colors were online and if one fabric at one store was either the same or different than the same fabric from another store.  So, I ended up buying yardage from two different stores.  It turns out that they were different!  One of them definitely had a blue tone to it (the children’s clothing) and the other was definitely more “pink-y”.  (They also make the fabric with a blue background, so there is a total of three different colors.)  We used home dec weight fabric from my stash for the bottom – from my Denyse Schmidt County Fair score a few months ago.  It worked perfectly!  I love it when that happens.

For the inside, we paired up “Around the World” fabric in Blue with the blue basket, and used the map fabric (in Brite) with the red/pink basket.  The handles on the blue basket are the “Hello” fabric in Blue, and the handles on the red/pink basket are “Goodies” in Brite.  Because these baskets were larger than the original pattern, and I was using just quilting weight cotton for the top, I also added a layer of medium weight interfacing to the lining to give the basket more structure.

The baskets were a huge hit!  I also filled them with my homemade blueberry jam and homemade pickles.  J’s teacher said the pickles reminded her of her mom.  Ahh…that is so sweet.

Kokka Not Lego Fabric

Kokka Let's Play fabric

Kokka Let's Play fabric -- washimatta shop on Etsy

Okay, it’s really called Let’s Play or something, but it totally looks like Legos.  Wouldn’t this be fun on the back of a Lego play mat?  I’ve been thinking of making one that is like the one the hubby remembers from childhood.  Sort of a circle, with a drawstring all around.  You play on the mat with your Legos, and when you are done, cinch it up and hang it on a hook or doorknob.

Thanks to True Up for highlighting it in their latest Quilt Market post about Kokka.  Love True Up.

Denyse Schmidt County Fair – SCORE!

Okay, my local Marden’s strikes again, and I had a total fabric score this morning.  Denyse Schmidt County Fair for $3.99/yard!!!!  Home dec weight, 54″, 3.99/yard???  How can you pass that up?  I have no idea what I will do with it, but something will come to me.  I bought all the red and blue that they had, but didn’t buy the two yellows.  I think I might go back though and get the yellow ribbon to make a valance for my living room.  A living room that I might add is finally finished, as of last night’s painting of the trim, so I will finally be able to find my camera cord and show you the pictures of my cool linen / bird applique tote bag that I made for the Alewives Fabric swap last month.  “Fabric Buyers Anonymous” anyone?

HDDS02BerryHDDS09Roseyhst-94042571855997_2066_1074663

tulipmarathonberry

HDDS04PorchHDDS08Porch

But what should I do with it??  I think I might make a skirt out of the berry fabric and I’m sure other ideas will come to me.

Maine Quilts 2009

Two friends and I went to the Maine Quilt show this past weekend which is put on by the Pine Tree Quilters Guild.  Wow, fun!  I’ve never been to a quilt show before, so I don’t know how this one compares with others, but I thought it was great.  We got there at 9am, left at 2pm, and probably could have stayed longer but we were starving.  Tons of great shops, both local and from away.  My favorite shop at the show was Alewives Fabric in Nobleboro, Maine.  They had a ton of great fabric, patterns, etc.  They were also demonstrating making fabric floorcloths, which look very cool.  A few days earlier they had gotten in the Heather Ross Far, Far Away collection in the double gauze.  I have never seen the double gauze, which was intriguing.  I was also able to test out a long arm quilting machine briefly.  I can see how that would be a lot of fun if I had $10k just laying around, LOL!

I was actually good, and all I bought were a few patterns.  It was hard to pass up all that gorgeous fabric!  I think this wool applique pattern from Lakeview Primitives will be a nice wall hanging for Christmas.  It was fun to see the fabric in person, versus all the internet window shopping that I normally do.  For example, my friend bought some home dec weight fabric from Denyse Schmidt’s County Fair collection, and it was so much prettier in person than it seemed online.  She’s going to make an Amy Butler Birdie Sling with the fabric, which Alewives had displayed in their stall, and is way cute.  I didn’t realize just from looking at the pattern that the shoulder handle is really just one strap and not two.  Really comfortable.

Another shop, the Calico Basket Quilt Shop, in Windham, Maine was doing a small demonstration on making exploding pineapple blocks.  Way cool.  The next day, I made some up with a Moda Flutterby charm pack that I had laying around, and they were really quick and easy.  You take two charm squares, and sew them all the way around, facing each other.  Then, you draw two lines diagonally between each corner.  You pull up just the top fabric, and clip a tiny bit in the middle where the lines cross, and then you cut all the way along both diagonal lines up to the seam.  You fold back the resulting triangles and press.  Sew a bunch together, and voila!  These are the simple ones.  You can keep combining the squares to make more intricate ones.

Exploding Pineapples

Exploding Pineapples

I have been in a flurry of cleaning for guests and the fact that we are going to be doing a tiny home renovation project that requires me to empty out my office.  Scary.  Very scary.  So, I have several projects in the works that are not done yet.  Sigh.

I did finish another US map quickie quilt for a friend of mine.  This time I used some great state fabric that I found at Joanns in their 4th of July/holiday section for the backing.

US Map Tied Quilt

US Map Tied Quilt

I also finally created a label for the baby quilt that I finished for my friend awhile back.  So, I need to wash it and it will be done!  I’m making her older girls some tote bags, which is why I haven’t sent it off yet.  I’m using the tutorial that Skip to My Lou just posted a little while ago.

The label is just a piece of natural colored organic cotton and I embroidered the baby’s name on it.  Then, I used a fabric pen to stamp the word FOR and hand-write my name and the year.  I then just pressed under a seam allowance, and used a blind stitch to tack it onto the back, making sure to only catch the backing fabric and not the front!

Quilt label

Quilt label

Cut out tote bags and summer shorts

Cut out tote bags and summer shorts

Underneath the tote bags are about five pairs of shorts that are cut and ready to sew together.  But I’m trying to get my gifts done first!  We’ve also been having a little Maine beach fun since it finally feels like summer!

IMG_4188 (1024x768)

Water was 53 degrees that day.  Brr!

Water was 53 degrees that day. Brr!

Fabric coasters

I love to make fabric coasters.  So quick and easy, with that element of instant gratification combined with usefulness.  We attended a family wedding last weekend, and purchased the standard “kitchen equipment” sort of present.  Well, not quite standard, but eminently useful and loved here at our household!  In any case, I also wanted to give the bride and groom a little something handmade as well.  We did a big “cousin dinner” thing while we were visiting and went out to the bride and groom’s favorite sushi restaurant.  Yummy.  Even the non-sushi-eating cousins were good sports and tried some things.  (Although the look on cousin Steven’s face when he ate the Philly roll was quite humorous.)

So, I whipped up these little sushi coasters.  On the back is some great fabric from Sandi Henderson’s Ginger Blossom line for Michael Miller (Blossom Buds in Mustard).  I got the sushi fabric at JoAnns, and it’s from Robert Kaufman.  The coasters are super-easy to make.  I cut 4.5″x4.5″ squares out of the two fabrics, and one same-size square of a thin cotton batting.  Sandwich it together, like such….batting on the bottom, backing piece facing up, front piece facing down.  Sew around the square with a 3/8″ seam allowance, leaving a big enough gap for turning it right-side out on one side.  Clip the corners off, although not too close to the stitching.  Turn it, and push out the corners with a chopstick or pencil.  Press.  Then, top-stitch around the outside, close to the edge, which also closes up the gap that you used to turn the little quilt sandwich.  I used a bright green thread for the top-stitching, which actually turned out quite cute and matched better than I thought it would.  Voila, coasters!  Easy-peasy.  And all fabric from my stash – even better!

IMG_3664 (1024x768)

IMG_3666 (1024x768)

Quickie tied quilt – US Map

US Map tied quilt

US Map tied quilt

I bought a US Map illustrated panel at Jo-Anns a long time ago with the thought to make a quick little quilt/blanket for the boys.  Well, the panel is one yard, so I bought one yard of backing material.  Wrong!  It wouldn’t fit because the widths weren’t right, so you need to buy 1.5 yards of backing and turn it.  Okay, so months later, I finally had J pick out new backing, and I sewed it together last night.  I just did a quick inside out quilt sandwich, turned it inside out, top stitched it around the outside, and then tied the quilt in a few places with embroidery floss.  Nothing fancy, but I think the boys will like the map!  J, especially, really likes maps.  Must be that Montessori influence.  It might make a nice playmat for playing with animals and guys.  I guess we’ll see how they like it when they come home from school!

J putting together the world map puzzle

J putting together the world map puzzle